Picking up where I left off after “first light” with my new ZWO ASI6200MM mono camera and filter wheel on 15 November 2025 (see https://beersastrophotography.com/photography-journals/the-plunge-into-mono-imaging-second-times-a-charm/ if you missed reading about that saga at the time)… I had the opportunity for “second light” during mid-to-late December 2025. This gave me a chance to collect more data – both to troubleshoot the issues I was having with the mono camera’s data downloading and to begin to develop a mono processing workflow. This blog describes the fits and starts of mono data collection and processing journey so far – I still have a LOT to learn!
I generated the image below of SH2-129 Spaghetti Nebula using my nascent mono processing skills (and many suggestions from Ann Chavtur) on New Years Day. I’ve captured data on three other targets over the course of the last couple of weeks of December – those data are waiting (patiently?) to be processed. Hopefully there will be subsequent posts before I head back to work on Monday morning after this “long” holiday break.
The mono imaging saga June – November 2025…
To catch you up in case you missed the mid-November blog describing the June – November 2025 mono imaging saga (check out: https://beersastrophotography.com/photography-journals/the-plunge-into-mono-imaging-second-times-a-charm/ for the full story)…
My first foray into mono imaging and processing was this summer using the QHYCCD Mono Mini camera and filter wheel combination – that I thought would be the perfect “easing into” that world with one integrated camera and filter wheel solution at a reasonable $1000 price point. That Idea fell into the “best laid plans” category and did not end well.
The short story was – the ASCOM driver for the camera worked well but the driver for the filter wheel (shouldn’t that be easier?) worked once for an imaging session from the driveway, but then reverted to insisting “there are only 5 slots” (vs. 7 for L-R-G-B-S-H-O). So, after a frustrating month of trying to get that to work, we returned it to Agena Astro (successfully convincing them that we shouldn’t have to pay the restocking fee for a product that never functioned correctly) and contacted Tolga at Tolga Astro to purchase a ZWO full frame mono camera – the ZWO ASI6200MM – and a ZWO 7-slot x 2” filter wheel.
The camera arrived before our trip to Utah for my birthday – I took it with me, but quickly realized I hadn’t downloaded any of the drivers, so although I had disassembled my OSC camera and replaced it with the mono camera to give it a try (on the Flying Bat Nebula with a OIII filter!) that was not going to work out…so back to the OSC camera for the rest of that trip.
In early November, I assembled the ZWO filter wheel, figured out how to attach the filter wheel and mono camera (it involves screwing them together – something that is not clearly described in their documentation), and attaching it to the Southern Cross. Then I downloaded and installed all the drivers, ready to image coincident with the “opening” of our HCH front patio – that had been “closed” because it was missing (i.e., a 20 foot deep hole where the front patio used to be) since April 2025 for a renovation project to fix the foundation issues we were experiencing.
First light and data collection with my new ZWO ASI6200MM mono camera and ZWO 7×2” Electronic Filter Wheel was on 15 November (with the SH2-240 Spaghetti Nebula). That night, I split my time between gathering data with the mono camera and OIII filter on (you guessed it) first, the Flying Bat/Giant Squid and second, the Spaghetti Nebula. I created an image – it was, after all, first light – so I felt the need – but there wasn’t much data to work with. …this was the image I produced with that dearth of data (3 hours over 3 filters, thus essentially one hour of data).

Fast forward to mid-December…
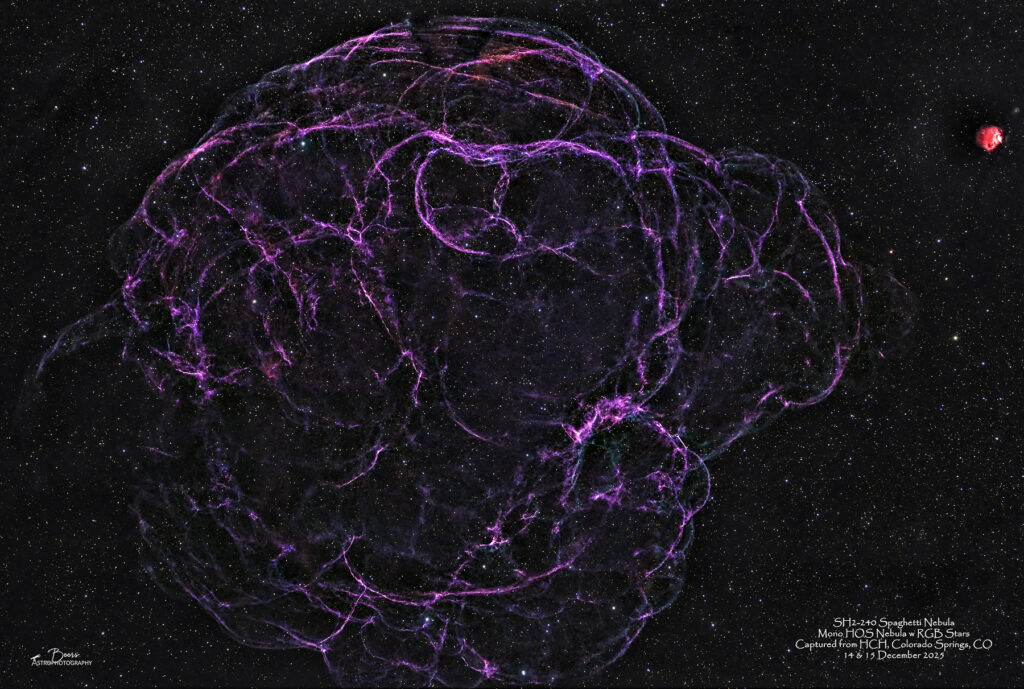
The chance for second light came just about a month later – 14&15 December 2025 when I had the opportunity to gather more data on SH2-240 Spaghetti Nebula to flesh out the spindly pieces of nebulosity I’d captured in November.
At this point, I’m not certain I’m really sold on this whole mono imaging idea – not only does it 3x or 6-7x the data collection time (depending upon which filters you use), but the processing is currently a huge struggle.
The processing of the 15 Nov 2025 SH2-240 data had me on the verge of signing up for the trial subscription of PixInsight. Then I went to the CSASTRO Holiday Party in early December and talked with Ann Chavtur, who had also just acquired a mono camera and filter wheel. She convinced me to look into Seti Astro instead of PixInsight. I took Ann’s advice, investigated Seti Astro, and decided to download both Seti Astro (contributing $40 to the developer’s cause – it’s (this is a new term for me) donationware) and also signed up for the 45-day free trial of PixInsight – thinking I would learn them side-by-side during my “free time” off from work for the holidays in December. In hindsight, that wasn’t the best plan – I prioritized learning Seti Astro, thus I’ve already burned through most of the 45 day trial without getting to the point of installing PixInsight (I’d gotten as far as downloading the software and was working my way through the star databases (that you have to download one-by-one!) when I decided I should focus on one task – learning Seti Astro Suite.
Seti Astro Suite’s developer, Frank Marek, has focused on developing the code rather than writing documentation. He has a website, a Discord site, and a YouTube channel. As far as documentation goes – he’s developed and published YouTube videos that cover all the features. As far as technical support, Frank suggests joining his Discord channel (which he is available through to ask questions when you run into an issue). Both of these are great – but more time consuming than having a written instruction manual at your disposal.
I spent the month of December, following the CSASTRO Christmas party (6Dec25), listening to Frank’s YouTube videos while I was driving (don’t worry – I was listening to, not watching them!). Then I watched them and took notes (to create my own documentation). This was very similar to what I did to learn astrophotography in the first place – sitting on my spin bike, watching YouTube videos, and taking notes! By late December (31Dec2025 to be exact), I felt like I’d watched enough videos, taken enough notes, and gathered enough data with the mono camera/filter wheel on both the Southern Cross and Big Bertha – that I should start processing.
I started out by using the Blink Comparator in Seti Astro (one of the key features I wanted both SW packages for) to cull through my .FITS subframes. It works well – giving you a full size view of each subframe (as opposed to the FITS Liberator user interface that give you a 3×4” view regardless of the size of your monitor) and calculates metrics on star size, number, and eccentricity and background brightness that can be used to cull out images prior to stacking.
I spent a frustrating morning on New Year’s Eve trying to process the SH2-240 Spaghetti Nebula data I’d captured on 14&15 December, with Seti Astro Suite’s set of processing tools. I was armed with my notes, the YouTube videos to rewatch, and I joined the Discord station. Frank was on the Discord channel – ready and waiting to answer my newbie questions! By about noon, when I needed to start helping with the prep for our NYE dinner, I was totally frustrated and had nothing to show for my morning’s attempt to process with Seti Astro.
Meanwhile, Ann had been perfecting her processing – specifically, combining the individual’s channels’ data into a color image using Astro Pixel Processor’s RGB combine tool. She’d been emailing me the combinations she was using and the results – amazing results!
So…on 1 January 2026 I backed up to the Seti Astro culled channel stacks and followed Ann’s lead. I loaded my stacked FITS images back into APP and used the RGB combine tool to create an RGB image. Once I had an image, I used my standalone Starnet++ (Seti Astro has integrated Starnet but my results with it had been dismal the previous day) to separate the stars from the nebulosity and then used my standard PS/LR based work flow to process the image to it’s “final” state.
I’m sure that I will go back and reprocess the data in Seti Astro (and perhaps if I’m quick enough with the PixInsight trial version before it expires) – but for now the 2+-week old data just sitting there unprocessed has been nagging at me like a missed deadline at work (YES, I do know this is just a hobby and shouldn’t be causing that stress, but…).
So, the images that follow (one for now, more to follow with what is left of my holiday break that went by WAY too fast!) are processed using the following high-level workflow: 1) capture the data using SGP (that’s ANOTHER story); 2) blink through and cull images using Seti Astro; 3) stack the acceptable images with APP (Ann also let me in on the secret that I can let APP do the filters’ lights separation and association with their correct calibration frames from the FITS header data rather than my by-hand by-filter by-session laborious process); 4) put the stacked images back into APP and use the RGB Combine tool to create a color image; 5) remove/separate the stars using Starnet++; and 6) process as usual with Photoshop and Lightroom.
Lots more learning to do here…but, there’s an image produced from data captured with my mono camera that’s better than the first light image. So, I feel like I’m moving in the right direction!
SH2-240 Spaghetti Nebula
The SH2-240 gallery is: https://beersastrophotography.com/gallery/sh2-240-spaghetti-nebula/. It contains all the images that I’ve captured so far of this DSO, including the two described in this blog. It also has an image from a couple of years ago captured from the front patio using a dual narrowband (Optilong L-eXtreme) filter on my OSC camera. Ironically, I like the color of the reds in that image much better – and was what I was trying to achieve while processing the mono data. Everyone needs a goal – astrophotography has given me many!!