Motivated by a combination of my unsuccessful attempts at capturing the faint OIII transmissions of the OU-4 Giant Squid within the SH2-129 Flying Bat Nebula and my curiosity with learning a new technology (imaging with a monochrome camera)…I suggested a birthday present idea to Paul…a QHYCCD MiniCAM8 monochrome camera with a built in filter wheel and seven astrophotography filters (LRGB and SHO). He jumped right on it, ordering the new camera in mid-August, so it arrived in time to be an anniversary present.
It turned out that while the idea of an integrated camera/filter wheel seemed like a good one, QHYCCD’s software driver implementation caused it to not turn out so well. I could never get the filter wheel driver to function properly and consistently. So, I ended up returning it. Then Paul jumped right on it again, ordering a new ZWO ASI6200 full frame mono camera and a ZWO EFW 7×2″ filter wheel – pushing me head first into the deep end of mono image capture (and processing!)
The second time was a charm (…or was it the push into the deep end? After all, I am a good swimmer!). On 15 November, I had a chance at first light with the ZWO camera and filter wheel from the newly re-opened HCH front patio – and successfully captured OIII data on OU-4! As an added bonus, I spent the rest of the night after SH2-129/OU-4 set capturing Ha, SII, and OIII data on SH2-240 Spaghetti Nebula. So, not only had I captured mono data with the camera and filter wheel, but I had two disparate data sets to put my (very, very nascent) mono image processing skills to the test.
The short “new equipment” report (a.k.a. saga) and link to the results…
To summarize this long blog…we started this journey in mid-August with the $1000 QHYCCD Mono Mini integrated camera and filter wheel. Ironically, while the camera’s software driver worked flawlessly, the filter wheel’s never did. The filter wheel driver would not consistently recognize that it had 8 slots, rendering it essentially inoperable in its ability to put the correct filter in front of the camera sensor as directed.
So, I returned it and Paul immediately stepped us up to the $4500 ZWO ASI6200MM full frame mono camera and separate ZWO EFW 7×2″ filter wheel solution. With that set-up there was a one bump along the way to first light, because ZWO’s document leaves a bit to be desired. I was left wondering, once I had the filter wheel assembled, how in the world to attach the camera to the filter wheel to the telescope with the two female-threaded connectors that were “in the box.” I stumbled over that bump (with my go-to helper, YouTube).
I am still struggling with the interface of the new imaging stream to the autofocuser (which I have ended up turning off during each sequence so far). But I did capture “first light” images of both SH2-129 Flying Bat & OU-4 Giant Squid Nebulae and SH2-240 Spaghetti Nebula from our front patio, which re-opened after being gone (i.e., a deep hole where it used to be) for 7+ months due to a foundation renovation project (that we will NOT discuss or picture here) on Saturday, 15 November 2025.
If that’s enough of the equipment story, feel free to skip to the gallery pages with the images created from that data. The SH2-129 Flying Bat & OU-4 Giant Squid is at https://beersastrophotography.com/gallery/sh2-129-flying-bat-ou-4-giant-squid-nebulae/ and the SH2-240 Spaghetti Nebula is at https://beersastrophotography.com/gallery/sh2-240-spaghetti-nebula/.
Read on if you’re interested in reading more of the in depth saga…er, I mean, technical details.
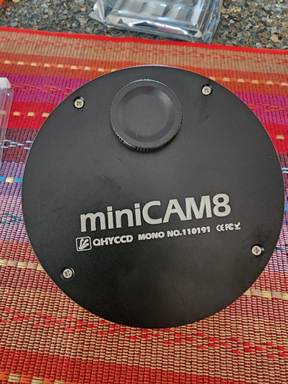
New Equipment #1 – QHY miniCAM8M Monochrome Camera, LRGBSHO Filter Set
I’ve been obsessed with the OU-4 Giant Squid within the SH2-129 Flying Bat Nebula ever since I saw Nico Carver’s image of it (https://www.nebulaphotos.com/sharpless/sh2-129/). I’ve been trying to capture it with my one shot color (OSC) camera for a couple of years now, even buying an OIII filter for the OSC camera – only to make a mess of it. Finally, one day Nico, in discussing my images said, “I don’t really know if an OIII filter will work on a OSC camera.” Then, in March 2025 he released his YouTube video on The Mini Mono Kit, featuring the QHY miniCAM8M Monochrome Camera with LRGBSHO Deep Sky Combo 7 Filter Set – a mini mono camera with a built-in filter wheel! Hmmm…I need one of those! I did some initial research on it, then put it on the back burner. In late summer 2025, with my birthday approaching, I told Paul, “if you’re looking for a gift idea…” and sent him the link: https://agenaastro.com/qhy-minicam8m-cooled-mono-cmos-astronomy-camera.html A few days later, before we arrived home from our Springfield one-night dark skies and anniversary adventure, the box had arrived from Agena Astro! That box’s arrival began the “adventure” of learning new equipment, including new (to me) technology (monochrome camera, filter wheel), and figuring out how to integrate it into my imaging and processing processes.
Step#1 / Issue#1: Opening the box and understanding all the equipment:
The integrated camera and filter wheel come in the box with a tray of filters to be installed in the filter wheel. Under the Styrofoam mold holding that camera and filter tray were several boxes. The boxes contained AC power cables, a computer connection cable, and a box filled with tools to assemble the filter wheel (tweezers, screwdriver, extra screws, etc.). I “inventoried” the contents by gazing into the open end of the box, then put them all away, awaiting the arrival of a DC power cable that Paul ordered – which came the next day. With all the pieces in place, I began the hardware and software integration process with my Southern Cross telescope, and promptly ran into Issue #1 (or so I thought). The “mini” in miniCAM describes its form and fit, in other words, the telescope connector tube that I use with my ZWO ASI2400MC full frame camera is way too big for the QHY miniCAM. Hmmm, how am I supposed to connect this camera to the telescope? I looked again in the box and didn’t see a connector tube, so I put everything away and submitted a QHY Trouble Ticket and sent an email to Agena Astro and Nico inquiring about the connector I needed to purchase. The next day, while I was at work, I got a response from Agena Astro (and Nico) with the “What’s in the Box” equipment list from the instruction manual (which I had just printed that morning on the color printer). I insisted, it wasn’t in my box – and was typing that response – when I thought, maybe it was on the underside of the Styrofoam camera holder. I called Paul to have him take a look. I waited impatiently as he opened the box, took out the camera and its Styrofoam holder – and didn’t find the connector tube. I was ready to hang up and fire off the “you cheated me” email to Agena, when I could hear him rustling with something and telling me to hold on. Again, impatiently, I waited for him to do whatever he was doing. His next statement was, “check your text.” There, was a picture…
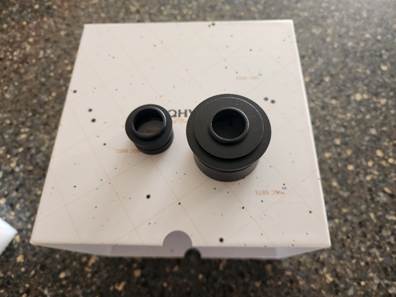
QHYCCD MiniCAM8 camera connector tubes, provided “In the Box”
Where in the world was that? It was in the box with the filter wheel assembly tools (the tweezers, screwdriver, extra screws) AND two connector tubes – one for a two-inch telescope receiver and one for a mini telescope setup. I promptly deleted the “you cheated me” verbiage from my email response, replacing it with a thanks to them for pointing out my oversight.
Step #2 / Issue #2: Drivers for the filter wheel insisted there were only five (5) slots instead of eight (8) – repeatedly!
The next step in the integration process was to download the instruction manual and software drivers from the QHYCCD web site. In my first attempt at loading the software drivers, I chose the “stable version” (vs. the Beta version), as the guidance in the video embedded in the instruction manual “it’s recommended to use the stable version; only those with certain experience should attempt to use the Beta version”. Not knowing if I had that certain experience – I opted for the stable version. After loading the ASCOM (a standard for astrophotography SW/HW integration) drivers for the camera and the filter wheel and attempting to get them to operate correctly – for over a day – I again reached out to QHYCCD Trouble Center, Agena Astro, and Nico for help. Nico was the first to reply (the Saturday night of Labor Day weekend).
Nico’s (prompt) response advised that he had used the Beta version without issue. Further he referred me to an SGP forum post (https://forum.sequencegeneratorpro.com/t/qhy-filter-wheel-3-7filters/17752/11) discussing a similar issue. Based upon Nico’s good experience with the Beta version and the advice in the SGP forum, I uninstalled the QHYCFW driver in Windows, downloaded/installed Beta AllinOne drivers (25.06.16.16), connected the MiniCAM8 to power and my laptop, verified the connection in Device Manager, updated properties is ASCOM Diagnostics and connected to the camera and filter wheel, opened the OU-4 sequence in SGP, connected to camera and filter wheel, checked settings – SUCCESS – 8 filters with the names that I’d given them assigned to the slots where I’d placed them!
Step #3: Some assembly required – installing the filters into the filter wheel:
Although the idea of having to assemble the filter wheel (i.e., place the filters into their correct position and in the correct orientation) seemed a little foreboding, it turned out to be a fun distraction from the software driver debacle for the mechanical engineer in me!
The instructions were clear and easy to follow; the process is illustrated in the photos below. I’m happy to report I disassembled and reassembled the filter wheel without dropping any of the tiny little screws (the screwdriver they provided in the toolbox was supposed to be magnetic to help with that…it wasn’t!), scratching or getting fingerprints on any of the lens, installed the filters facing the correct way (although I doubted this after the first night’s attempt at imaging), and with no spare parts left over!
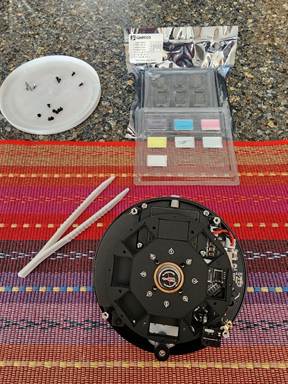
Three sets of screws removed, filter package opened, tweezers (provided) at the ready…

The filters go here…carefully and in the opposite direction than they are sitting in the shipping tray (Paul, please come look at this diagram please and confirm that I’m not putting them in backwards!)
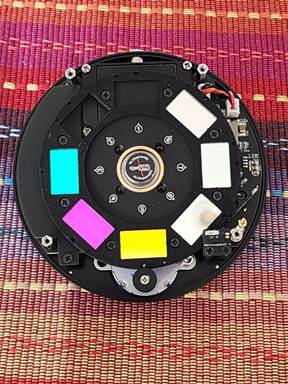
Filters placed in their slots and the slot cover back in place. 1=Dark; 2=Luminance; 3=Red; 4=Blue; 5=Green; 6=SII; 7=Ha; 8=OIII
Back together…no lost or dropped (into the underlying electronics) screws or scratched filters!!
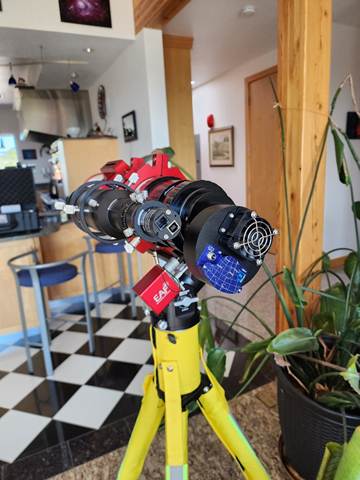
Step#4: Assemble the Southern Cross sporting its new imager and filter wheel:
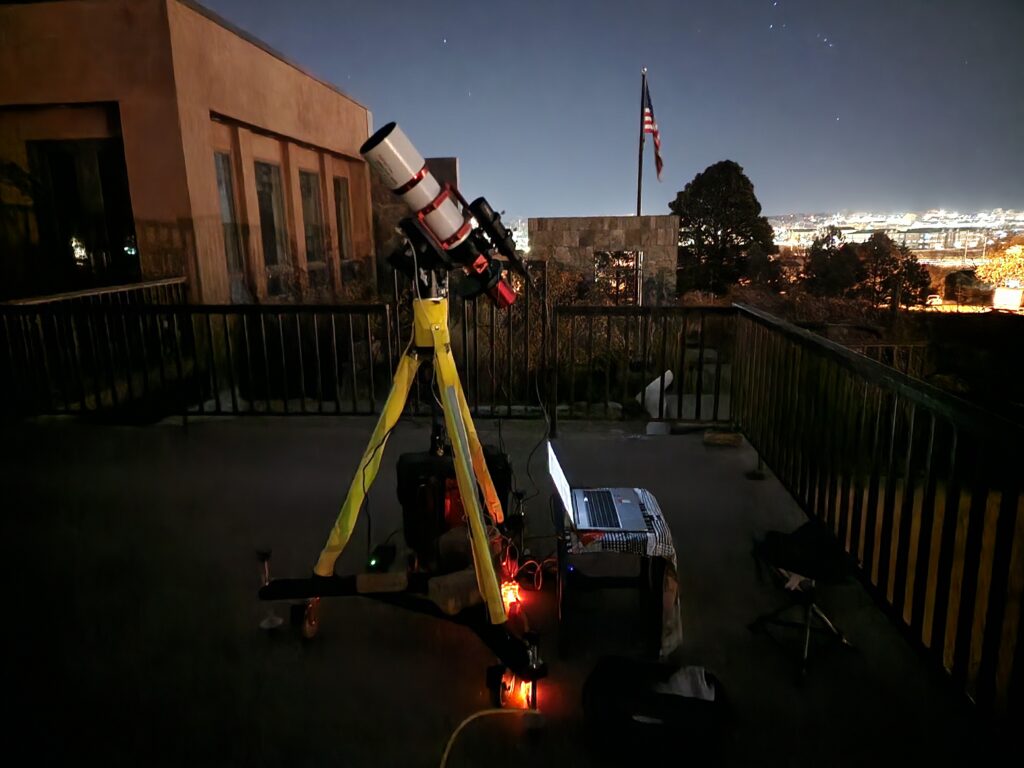
Sunday afternoon, with the driver issues behind me and the filter wheel assembled, I assembled the Southern Cross for my (attempt at) first light with the QHYCCD Mono MiniCAM8M. After resolving issue #1 (locating the connector tube) earlier in the week, the mount – telescope – camera/filter wheel assembly went flawlessly. The QHYCCD MiniCAM8 is the “large” round object (with the fan assembly and blue celestial globe plate) at the near end of the telescope in the photo below.
Step #5 / Issue #3: Give the new equipment its opportunity to capture first light:
The Sunday night of Labor Day weekend, I waited for the evening clouds to clear, hauled all the equipment out to the driveway (the front patio was still inoperable (a.k.a. missing due to a foundation renovation project) to set up for first light. I got the “new location” actions (so the mount recognizes that it is not at the place where you last used it (i.e., Springfield, Colorado)) and polar alignment done quickly and easily. I connected the equipment through SGPro (successfully – YEAH for the correctly configured ASCOM drivers!) to begin the imaging sequence on (you guessed it!) OU-4 the Giant Squid inside the SH2-129 Flying Bat Nebula. The first step in the SGPro sequence is for the mount to slew to the vicinity of the target and for the electronic autofocuser (EAF, the red box in the photo above) to focus on that star field. That’s where my night took a dramatic turn for the worst!! I spent the next three hours in a frustrating AND ultimately unsuccessful, attempt to achieve focus.
Near the end of the three hours spent repeating this same process with different filters, different exposure lengths, and different focuser positions it dawned on me that I should go back to the way that I used to focus the telescope before I got the autofocuser – manually with a Bahtinov lens while the telescope points at a bright star. But by the time I had that thought, I was too tired to remember how I used to do it! …and I was starting to get chilled, so I rebooted everything, moved the focuser to about the position where my OSC camera is in focus and gave it one last attempt. No joy. So…tired, chilled, and defeated I packed up the equipment, rolled the telescope into the garage and gave up for the night (taking the time before I went to bed to send an SoS message to Nico for assistance in the morning to get me off dead center).
In the morning, I’d received a response from Nico with suggestions on the autofocus issue. So, with a renewed sense of hope, I finished building my “focus sequence” to begin the night’s imaging with the telescope slewed to Alderamin to get it into rough focus. I noticed as I was building that sequence, in SGP there’s a checkbox for “dark subtraction.” So, I spent some time building a “dark focus library” with exposure lengths of 1 – 12 seconds, because you have to have a dark for each focus exposure used +/-2 seconds. (This is what PHD2 does for you when you first connect a new camera!). I also changed the histogram’s stretch value, but even with that, the darks’ unstretched histograms were all amazingly bright (at a position on the histogram more like flats than darks) – pretty much consistently across the 1-12 seconds, so I was hoping that the dark subtraction would help.
I got everything set up to make another run at first light on Monday night. The other change I made when I went out to start imaging (I know, bad on me – real scientists only change one variable at a time!) was I positioned the telescope so it was mostly blocked by a big pine tree from “staring” directly at the street light …I was closer to the garage so that would shorten the time I could image into the early morning hours, but it seemed like a good trade-off (besides I was getting up at 0400 to go running before work and would end the sequence before I left, before it “hit” the garage parapet…).
Either the lack of a direct view of the street light or the dark focus library did the trick! I moved the telescope’s focuser all the way to its zero position, moved the filter wheel to the Luminance filter, and started the sequence on the Alderamin focus star. As soon as the telescope did its initial move to the Alderamin area, I cancelled the SGP autofocus routine, aborted the plate solving, and began the process of manual focusing – systematically moving the focuser out by 1000 steps and recording what that equated to in focuser position (just for future reference for focus point definition purposes). Even with the focuser all the way in at zero, the focusing “take one” exposure (8 sec, 2×2 binning, Gain=67, Offset=76) was dark enough to see the big white blobs of out of focus stars against a “darker” background! When I got to EAF position of 8000, I took a focusing exposure…18 stars with an HFR of 8.91. I moved it out to 9000, then 10,000 to discover I’d clearly gone past focus. So, I moved it back to 7800 – 113 stars, HFR 4.04; then 7600 – 366 stars, HFR 1.75. At that point, I knew I was in the neighborhood. I put on the Bahtinov mask to do a little bit more tweaking – 7600 was slightly out of focus, 7500 was moving it in the wrong direction, 7700 seemed “just right”! I took the Bahtinov lens off and restarted the SGP sequence (the first step of which is to run the autofocus routine – I had the EAF set for 9 steps, step size of 100). The pre-plate solving autofocus resolved at 7625 with a HFR of 2.3, with a 99% best fit match (a curve fit match of the parabola it forms from all the individual points to determine the optimal focus point)! The plate solver zeroed in on Alderamin in the center of the frame, the autofocuser ran again and resolved at 7633, HFR of 2.7 and a 93% match. Success autofocusing on the stars in the region of the Alderamin focus star.
Satisfied that I had the focuser in “near focus” I moved on to the real target…OU-4 Giant Squid, with the OIII filter. As the initial autofocus routine ran and the “V” formed the vertex of the V was at EAF position 7533, but the SGP autofocus routine would not resolve a focus point (the shape of the parabola was skewed to include the first and last two points of the autofocus routine which drew it up to a match rate of 71%). I tried a couple of times on OU-4 with the same result, then moved back to Alderamin to see what the result would be with the OIII filter (vs. the Luminance filter). I had to increase the exposure rate on the focus frames to 10 seconds, but the focuser resolved at 7533. I went back to OU-4 with the OIII filter, starting the EAF routine at 7533 and again had the same failure – the vertex of the V was clearly a minimum at 7533 but the parabola was forming including the first and last points pulling it up to an unsatisfactory match level in the EAF routine’s judgement. So, satisfied that the image train was in focus regardless of the EAF’s algorithm’s opinion, I cancelled the EAF routine and began collecting data on OU-4 at 22:56MDT…thirty (30) minutes before the meridian flip…and went inside and laid down for those 30 minutes.
Since I have never been successful in having all the equipment execute and come back into operations after an automatic meridian flip, I always do the meridian flip “by hand”. To do that, I end the sequence, park the telescope, disconnect the equipment, disconnect/reconnect the autoguider camera, reconnect all the equipment and restart the sequence (and if I’m 10 or more minutes past the meridian, it almost always goes to the correct side of the pier).
While I was “resting” during the 30 minutes before the meridian flip, I was thinking about the changes I should make to the steps and step size of the EAF routine. Before I went to bed, I had changed the number of steps to seven (7) while leaving the step size at 100. As I laid in bed and did the math, I decided instead to change the EAF routine to 9 steps of step size 75…giving the same distance between the end points but hopefully a better shaped parabola. Good theory – that failed in execution. In the process of the EAF routine the focus parameters at position 7533 were HFR 0.6 and 99% match to the points collected to that point. The EAF continued to move the focuser back out of focus in the inward direction through the remaining steps. At step number 8 there was a most beautifully shaped parabola formed with a calculated focus point of 7516, 0.9 HFR and 99% to all the points so far. Then it collected the last point…which moved the parabola up to a 70% match and the EAF routine again failed…ARGH.
Okay, enough of that! I cancelled the EAF routine (so the sequence restart collecting data where it left off before the meridian flip), updated the sequence to collect on the OIII filter (so as not to deal with the uncertainty of focus point for a different filter) for the rest of the night, turned off the EAF, and went to bed.
The fact that the EAF would resolve focus with the OIII filter on Alderamin but not on OU-4 is confusing. There is a note in the SGPro EAF routine instructions stating there are regions of the sky with issues. They request that if you run into one of those spots and experience an issue, to report it to them…so I did. (They acknowledged my ticket, but didn’t provide a good solution.) Strangely enough, I’ve also had issues with SGP’s framing and camera rotation of the SH2-129 / OU-4 region in the past. Is it the astro imaging Bermuda Triangle?
Step #6 / Issue #4: (The straw that broke the camel’s back) Determine the appropriate exposure setting for calibration frames by starting up the equipment again the following morning:
This ended up being the straw that broke the camel’s back! Now that I’d successfully collected lights, I needed to collect calibration frames (flats, dark flats, bias, and dark frames) to use during stacking in processing the light frames. When I powered up the equipment to do that (after successfully using it just hours before), the filter wheel had reverted back to its 5-slot configuration!!
I submitted another Trouble Ticket to QHYCCD. I simultaneously reached out by phone (getting their answering machine that said “it’s better to send us an email”) and then email to Agena Astro asking them to serve as a go-between with QHYCCD’s technical support. Agena’s response was “I see that you’re in contact with the manufacturer, that’s the best approach.” When I pushed them in a subsequent email, they sent me “technical advice” from a Google search! At that point, I vowed to not buy anything from them again – if they believed that was acceptable customer support! I got an equally frustrating response from QHYCCD (essentially starting over with “what version of the driver did you load”).
What seemed like a good idea to ease into mono imaging with a $1000 camera/filter wheel combo…was not. I contacted Agena Astro for a return authorization. They balked at not wanting to charge me the restocking fee (of 20%) – but backed off once I reminded them of the week’s long issues I’d had in trying to get this equipment to work.
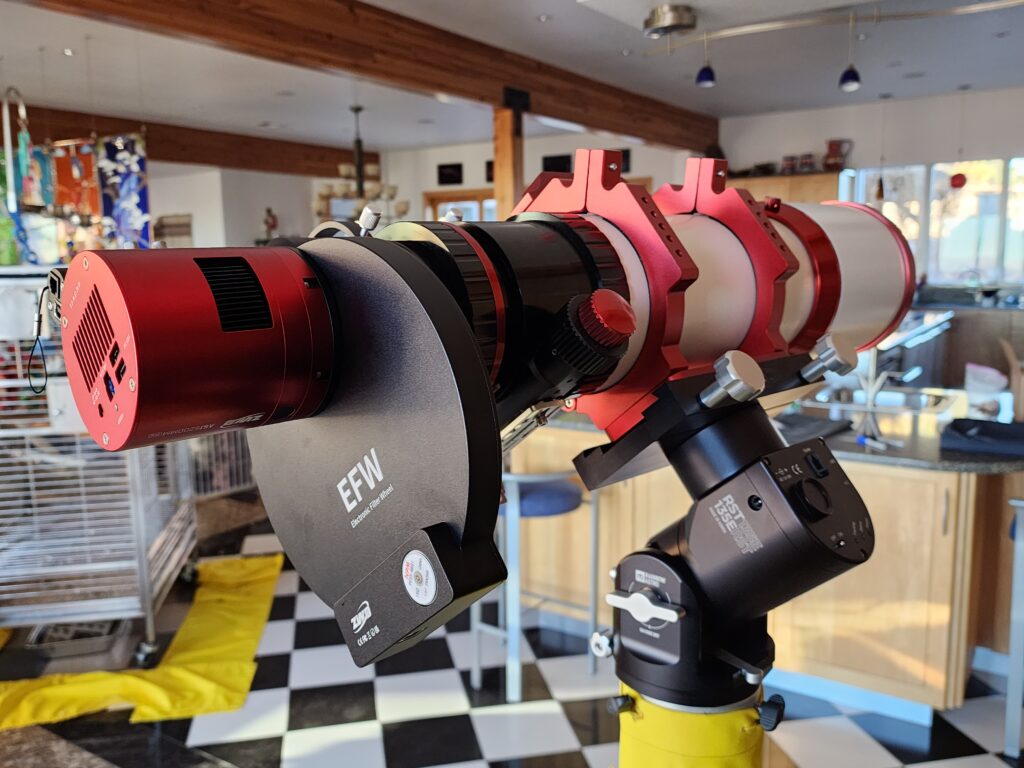
New Equipment #2: ZWO ASI6200MM Full Frame Monochromatic Camera & ZWO EFW 7×2″ Electronic Filter Wheel
Having gotten my Christmas cards created, produced, and addressed; and the calendars created and produced by Veterans Day I returned my attention to assembling and loading the control software for my birthday present the ZWO ASI6200MM and ZWO Electronic Focus Wheel (EFW) which had arrived in late September. Putting the mono camera, filter wheel, and its control software together; the completion and opening of the front patio for imaging; and a clear night near the New Moon all came to fruition on Saturday night, 15 November 2025 to give me the opportunity for “first light.”
Step #1 / Issue #1: Installing the filters into the filter wheel
I started the process of putting together the new equipment on Friday afternoon(14Nov25) when I got home from work. I unscrewed the back of EFW and screwed in the filters. With all the filters installed in the wheel, I discovered that the Orion LRGB filters that used out of my stash of equipment from Paul’s original purchase of Big Bertha, were 10mm in thickness and precluded the filter wheel from turning. I got online and ordered Optolong LRGB filters from Amazon. For balance, so that I could continue with the process until new RGB filters arrived, I unscrewed the too-thick RGB filters and filled their slots with the Optolong filters that I had: Luminance (IR/Cut), LeXtreme, LeXtreme, and LPro. So, for the time being, the order of filters in the filter wheel was: Lum, LeX, LeX, LPro, S, H, O.
Amazingly enough the Optolong LRGB filters were available for overnight delivery, so they were in our delivery box by 0500, on Saturday morning, 15 Nov 2025. After I got home from my run on Saturday morning, I continued the process. I removed the LeX and LPro filters and put the newly-received Optolong LRGB filters in their place. So the ZWO EFW 7-slot EFW configuration is set at: LRGB-SHO – 1: Lum; 2: Red; 3: Green; 4: Blue; 5: SII; 6: Ha; 7: OIII. …and the filter wheel’s cover was back in place, ready for the next step.
Step #2 / Issue #2: Assembling the telescope, filter wheel, and camera
Once I had the filter wheel assembled, it was time to assemble the Southern Cross with its 0.7x reducer to the EFW to the ASI6200MM. I had two diagrams to follow to get this assembly done correctly: 1) diagram in ASI6200 Manual (that was incomplete); and 2) diagram in the 3″x4″ sized ZWO Cooled Cameras Quick Guide that came in the box with the camera (that was more complete, but too small to be easily readable).
I laid out and inventoried “what’s in the box” from the ASI6200 Manual. Then Google searched on “how to connect ZWO ASI6200MM to ZWO EFW to Askar FRA600 with Askar 0.7x reducer.” The AI Assistant came up with an answer:
To connect the ASI6200MM to the EFW, reducer, and telescope, you will screw the ASI6200MM camera body to the ZWO EFW, then screw the EFW to the Askar 0.7x reducer, which in turn connects to the Askar FRA600 telescope’s M60 male thread via its M60 female thread.
Step-by-step connection guide
- Mount the Camera: Screw the ZWO ASI6200MM camera’s back into the front of the ZWO EFW.
- Connect to the Reducer: Screw the rear of the ZWO EFW onto the front of the Askar FRA 0.7x reducer. Ensure the connection is tight to prevent light leaks.
- Attach to the Telescope: Attach the Askar FRA 0.7x reducer’s M60 female thread to the Askar FRA600 telescope’s M60 male thread.
- Power and Control: Connect the ASI6200MM camera and the EFW to their respective power supplies and control devices (like an ASIAIR or a computer) using the provided cables.
- Calibrate (if necessary): If you have issues with the filter wheel, recalibrate it using the ASCOM driver in your software by clicking the “ReCalibrate” button.
I was stumped on the first step “mount the camera” since there are female threads on both the camera and the filter wheel. So, YouTube saved the day! In View into Space: ZWO EFW – Electronic Filter Wheel – Unboxing & Installation https://www.youtube.com/watch?v=7qHF7jQ7tqo starting at 4:40 Sascha Wass finishes putting in the filters and begins explaining how to attach the camera to the filter wheel, he removes the 5mm tilt plate and screws the camera to the filter wheel.
I assembled the camera/EFW using his method and then began to calculate the backfocus to the Askar FRA600 with 0.7x reducer…and could not come up with the 55mm backfocus that was needed to achieve focus, no matter how I did the math. I reached out to Sascha, Nico, ZWO Technical Support and was about to buy a set of connector tubes, when I went searching on the ZWO site one last time for technical specifications. I happened upon an expanded version of the Quick Guide in the product description for the EFW (i.e., NOT in their technical manuals, but in a description if you were going to buy it).
In ZWO EFW 7×2” Product Description at: https://www.zwoastro.com/product/zwo-efw-5-x-2inch-7-x-2inch/ was a link to 5 ways to make the connections (that included leaving the tilt plate on). It further referenced an article buried in their blog: “5 connection methods to get 55mm back focus length” at: https://www.zwoastro.com/2024/09/26/asi6200-guide-5-connection-methods-to-get-55mm-back-focus-length/. The one that had the closest resemblance to my equipment including leaving the 5mm tilt plate in the imaging train! So, I disassembled and re-assembled the camera – filter wheel to put the tilt plate back on and connected with the connection tubes provided – the backfocus is 56mm! I made the assumption that would be close enough, and if not, I’ll go with the idea of buying a full set of connectors and again remove the tilt plate to get exactly 55mm.
Step #3: Software installation
While I was spending most of the day figuring out the hardware installation and connections, Paul and Randy (our metal railing and gate guy) were busy installing the railing on the front patio AND it was forecast to be clear. With the camera and filter wheel connected finally completed at about 16:00MST, the last and final step was to install the software drivers, build a new SGPro equipment profile, and build a sequence with the new equipment profile…no pressure, I had almost 90 minutes before dark!
Surprisingly enough, the software installation which is usually fraught with interface issues, went very smoothly…including the equipment connecting (electronically) to the laptop on the first try and the ASCOM driver recognizing there were seven slots in the filter wheel from the start! SGPro recognized the filter definition that I put into the ASCOM driver, making the build of the SGPro equipment profile relatively quick and easy. Finally, I built the sequences (for SH2-129/OU-4 Flying Bat/Giant Squid and SH2-240 Spaghetti Nebula) by editing those target’s sequences from my October imaging plan – applying the new equipment profile, selecting filters, and defining subframe exposure timing). All of that software installation and sequence control definition, which I was dreading based upon my QHYCCD experience, was done in about an hour – leaving me about 30 minutes of dusk to roll the telescope out onto the “newly open for imaging operations” and get things set up.
ZWO ASI6200MM Mono Camera & ZWO EFW 7×2″ Filter Wheel First Light – 15 November 2025
I started the night with capturing OIII data on the OU-4 Giant Squid in SH2-129 Flying Bat Nebula (as you may recall that was the motivator (obsession?) that started me down this road in the first place!). Then I planned to switch to SH2-240 Spaghetti Nebula once the SH2-129/OU-4 set at about 01:30MST.
The sequence start-up had a couple of bumps – neither of which were associated with the new equipment. First, the new version of the ASCOM platform (v7.1) that I’d loaded on top of the old platform version is 64 bit. It would not interface with the autoguider camera’s SSAG Pro’s 32 bit ASCOM driver. That error surfaced when the equipment was connected. I went searching for an updated SSAG Pro ASCOM driver (thus the reason for wanting to do this first use on the front patio vs. in dark skies where I had no internet connection). The search ended when I discovered that Orion Telescopes (who we had purchased the SSAG Pro from) has gone out of business (so much for contacting the manufacturer). All the forum locations where people had stashed drivers were either inaccessible or empty. I decided to ignore the error message and proceed (vowing to drop back to ASCOM Platform 6.2 in the morning) – amazingly enough, that approach worked!
Second, as with previous experiences when a new element is introduced into the imaging train, (see: QHYCCD Mono Mini Step #5 / Issue #3: Give the new equipment its opportunity to capture first light above) the autofocuser struggled with producing a parabola that was acceptable (even though the “V” clearly identified a good focal point). I tried a couple of “edits” to the EAF’s algorthm – all to no avail. I’ll need to spend some time on a clear night running the focuser step size/step number algorithm to find the right settings – and to determine the offsets between filters. But for this evening, I decided that I wanted to gather data (i.e., actually have an image from my “first light” experience) so I cancelled the autofocus routine set to run on the hour during the sequence and settled for the focus point that had the “V’s” minimum HFR.
By the time I got the SH2-129/OU-4 sequence started, it was well past the meridian flip, so I imaged from 21:17MST until the target set below the house roof line at 01:25MST, capturing 43×5 minutes OIII subframes.
After completing the SH2-129 data collection, I parked the telescope in its home position, recycled power on all the equipment, brought up the SH2-240 Spaghetti Nebula sequence and began its sequence. Surprisingly, the autoguide camera’s ASCOM driver error never resurfaced. Not surprisingly, again, I had challenges with the autofocuser (and ended up turning it off, keeping it from running during the sequence).
The camera angle needed to be changed between the two targets, so I bumped into a learning curve there. I’d forgotten to change the camera angle before I started the sequence, while the telescope was parked and the camera/filter wheel (which you may recall move as a unit because they are screwed together) could move a bit more freely. I was reminded that I needed to change the camera angle during the plate solving routine, when the telescope was pointing almost directly straight overhead with the camera end of the telescope near the tripod legs (i.e., in a position that it could not be rotated by ninety degrees). So, I had to end the sequence and re-park the telescope to rotate the camera/filter wheel assembly by 90°, then restart the sequence (which relaunches the autofocus routine…). Thus, the one hour between SH2-129/OU-4 sequence end and SH2-240 sequence start.
Alright, already, show us the images…
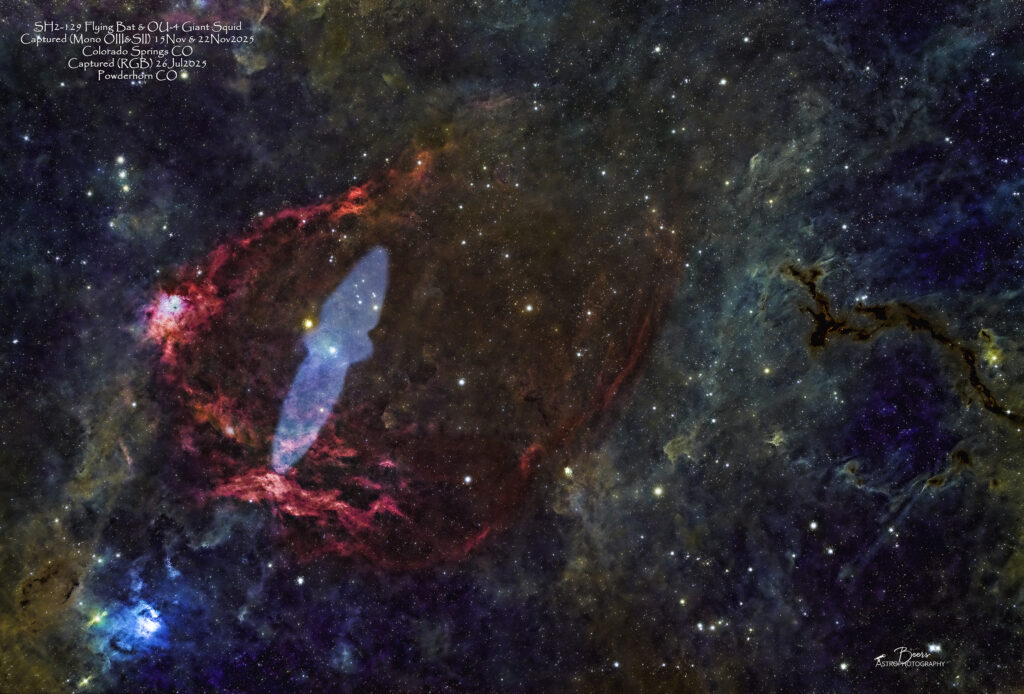
SH2-129 Flying Bat & OU-4 Giant Squid
I began with processing the SH2-129/OU-4 Flying Bat/Giant Squid during the evenings throughout the week of 17 November 2025 (I spent Sunday, 16Nov2025 calculating the correct exposures for and capturing calibration frames for each of the filters). My plan was to process the OU-4 Giant Squid data and combine it with the RGB image I captured of the SH2-129 during our July dark skies trip to Tolvar Flats. By Friday, 21 November 2025 I had created a version of the image, that wasn’t great, but was passable as “first light” with very not enough data. Then I discovered that it was going to be clear on 22Nov2025! So, the website posting and blog writing would have to wait while I captured more data on the same two targets on Saturday, 22 November 2025.
On Saturday afternoon, I went online to Telescopius and found images of SH2-129 that had the glassy look of the OU-4 Giant Squid that I’m striving for. All the images were using an exposure length of 450 or 600 seconds, so I opted for 600 seconds. I also added gathering data with the SII filter (5 minute exposures) since that filter seemed to pick up much more on the SH2-240 Spaghetti Nebula than the OIII filter did. Everything went well with the sequence start up – except for the autofocuser – again, it would find a perfectly good minimum on the “V” (in this case, 8902 with a HFR of 1.6) but couldn’t fit a parabola and threw a “can’t find focus” error. So, I turned off the autofocus throughout the sequence. Got the sequence started at 17:49MST (threw away the first light frame as it seemed to be much brighter than the rest). I ended the sequence at about 01:00MST when it was approaching the roofline, capturing flat, dark flat, and bias frames.
The image that is posted in the gallery (and shown here for those of you who have had the perseverance to read this far!) was created from three session’s data: 1) RGB data from dark skies trip to Tolvar Flats, 26 July 2025; 2) OIII data from both 15Nov and 22Nov to create the blue OU-4 Giant Squid; and 3) SII data from 22 Nov to enhance (richen and darken the color) the red along the outer portions of the SH2-129 Flying Bat. BTW – this image is v3 post the version that I created on 21Nov2024 (which was v2 with the data included to that point) – because I had a hard time coming back to the processed image and not see flaws that I wanted (needed?) to correct. It’s still not as good (glassy-wise in the OU-4), but much better than any other image I’ve produced…and it will get better with more data (which you KNOW I’ll continue to collect)!
The gallery post is: https://beersastrophotography.com/gallery/sh2-129-flying-bat-ou-4-giant-squid-nebulae/
SH2-240 Spaghetti Nebula
“First light” night’s second image is comprised of data captured with the Ha, SII, and OIII filters then combined to produce an RGB final image. Although the capture went well – the processing did not. There’s a dearth of information on how to combine mono images into an SHO (Hubble palette) or RGB image with Photoshop. I spent a great deal of time watching videos that weren’t talking about the SW processing tools I own (APP, LR, PS), trying to apply them, and ultimately inventing a process. I’ve been on the verge of getting a trial subscription of PixInsight – and the full day+ spent in processing this image (with an alright but not great result) has pushed me over that edge! But, for now – this will be “first light” with the ASI6200MM and “first processing” with SII, Ha, OIII filter data into an RGB image with APP, Starnet++, Lightroom, and Photoshop.
The gallery image is: https://beersastrophotography.com/gallery/sh2-240-spaghetti-nebula/. Please note that this is less than three hours of data spread across three filters, so essentially this is one hour’s worth of data. …and I really have no idea how to process mono data with LR/PS. So…it can only improve; especially as this target moves into full visibility throughout the winter’s longer hours of darkness.
