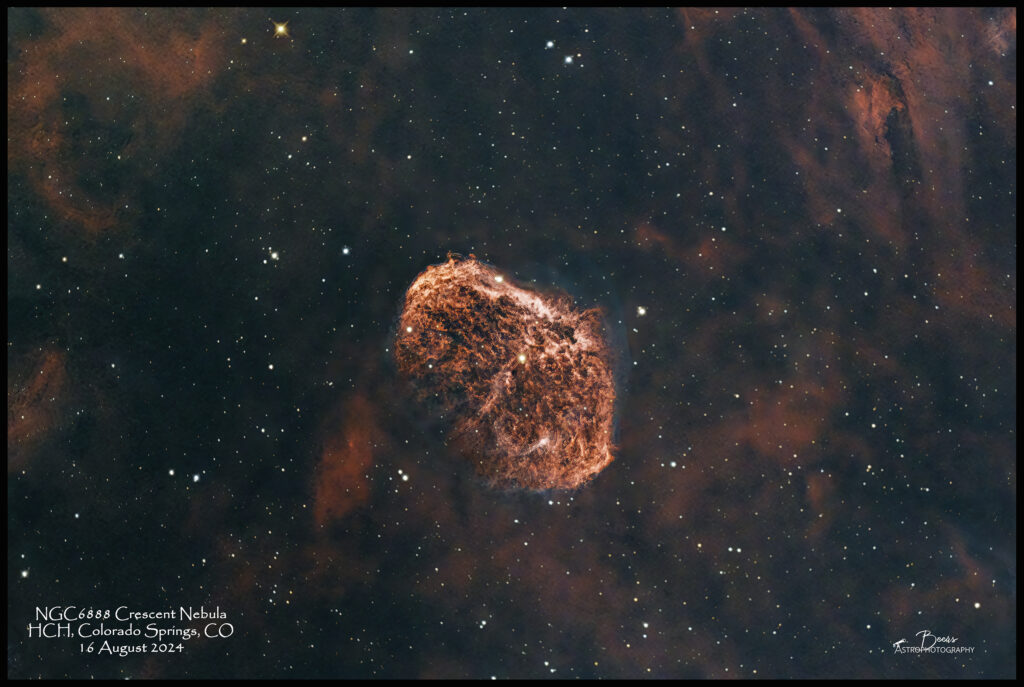
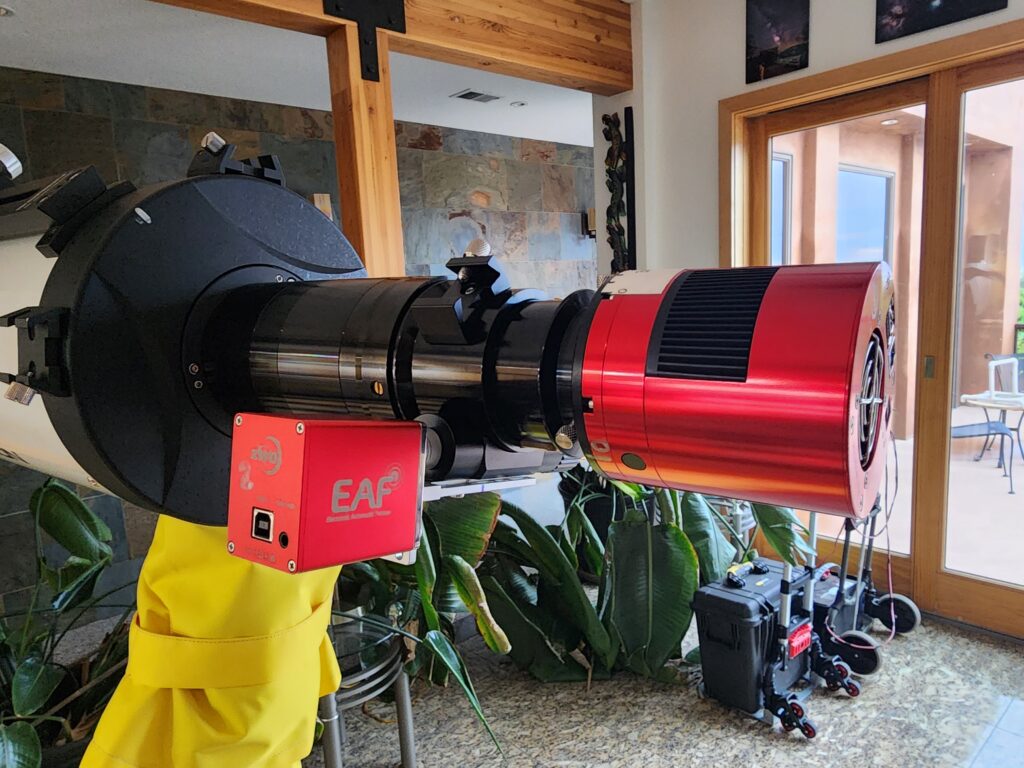
This image represents first light for Big Bertha’s new TS 2.5” Rack and Pinion Focuser, replacing the Orion Crayford focuser she came with. This blog has “the rest of the story” of the focuser, the SGPro autofocus routine, and my continuing struggles to get the hardware and software to work together. In other words – this is all about the equipment. If you’re all about the photos and not all that interested in the equipment, please jump to the gallery for the target information and image(s) of NGC6888 Crescent Nebula at: https://beersastrophotography.com/gallery/ngc6888-crescent-nebula/
The ZWO EAF and SGPro’s focusing algorithm continue to baffle…
I’ve been struggling with the SGPro autofocusing algorithm when I use autofocus during a sequence. Most times it fails – repeatedly attempting the focus routine at the designated time (I have it set for once an hour), never finding a greater than 90% confidence solution, and ultimately returning the focuser to its starting point – taking up imaging time without changing the focus.
So, I decided to read the SGPro instructions (YES, really!). There I found an exercise meant to help you determine the correct step-size for your specific equipment configuration. This exercise has to be done in the dark under clear skies (because you need focus on real stars during the exercise). I’d done this instruction reading while we were camping at Powderhorn, but decided I didn’t want to waste valuable dark skies time on it – especially since the instructions start off by saying “You’ll need approximately 20 minutes and a lot of patience”). So, I turned off the autofocus routine and deferred the exercise until I had a clear night at home.
I had that clear skies opportunity at home on 28 July 2024 to try the exercise (spoiler alert: it failed miserably!). For background, during the SGPro autofocus routine the focuser, starting at a point of near focus is moved a designated number of steps (of step-size to be determined by this exercise) out of focus. Then, the focuser is gradually moved back inward. This takes the focus from out of focus, through optimal focus, and back out of focus (in an inward direction). In the course of doing this, SGPro creates and displays a graph of the stars’ average half flux radius (i.e., size) plotted against the focuser’s position. That graph should look like a “V”. The in-focus point is determined by drawing a best-fit hyperbola through those points and calculating the confidence level of true focus. The algorithm ends, determining it has done its job successfully when it has a focuser point that gives 90% or greater confidence that its found the optimal focus.
When I did the exercise, I came up with a step size of 150 (which seemed too large, even though I followed the instructions to the T). The final step in the SGPro instructions is: “That’s if! Let’s kick the tires. Using the “Focus module, go ahead and click the “Run” button. You should see a “V”. I hit the “Run” button and instead of a V, I got a straight line – starting at in-focus and gradually moving further and further out of focus with each step! Yes – going from sometimes successful to 100% never going to work!!
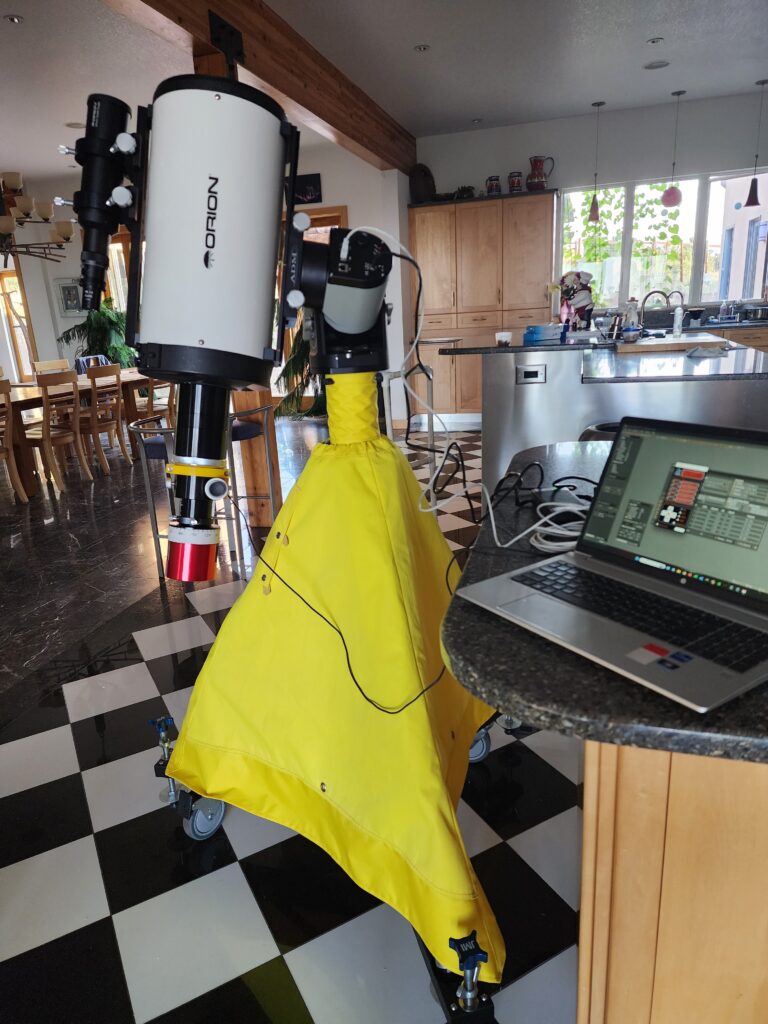
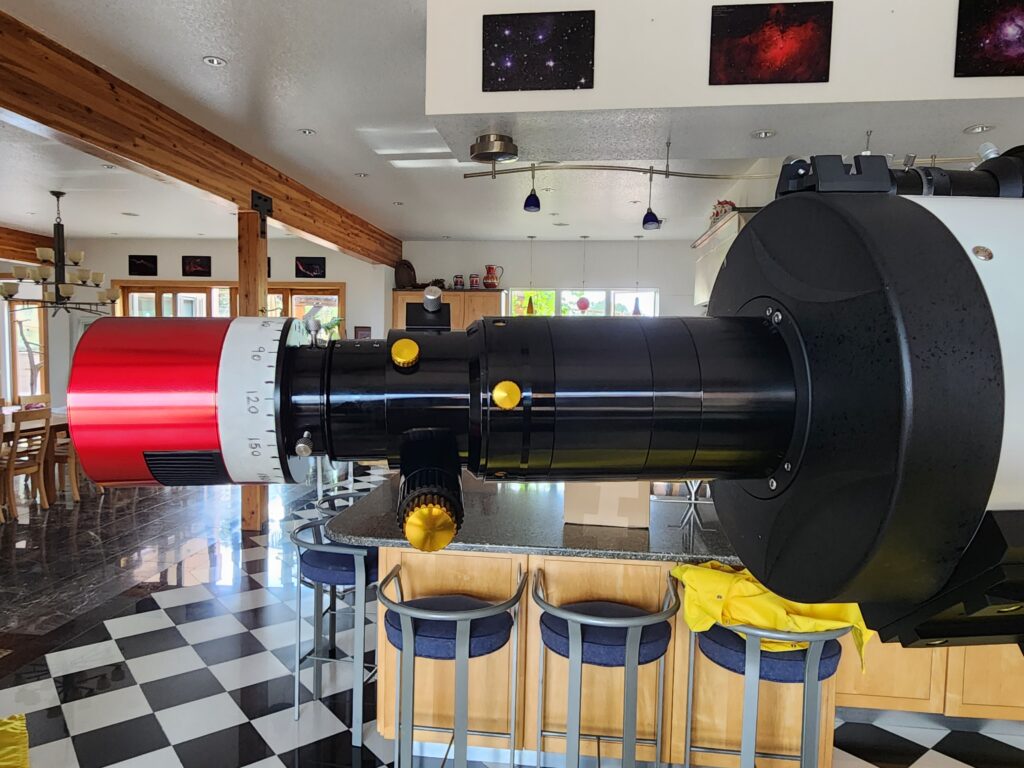
SGPro support postulated that the issue I was experiencing was due to my (Crayford) focuser not moving the same distance “out” as it is moving “in” given the same step size in each direction. They instructed me to conduct an experiment to test that theory. As I was lamenting how much of my clear skies time was being spent troubleshooting the autofocuser, it dawned on me that this experiment could be conducted inside, in the daylight. So – lucky you – you get to see pictures to go along with this story!!
Step 1: Place the telescope in a position such that the focuser is most affected by gravity (i.e., pointing straight upward)
Step number two is to move the focuser all the in and measure the distance – to determine the starting point.
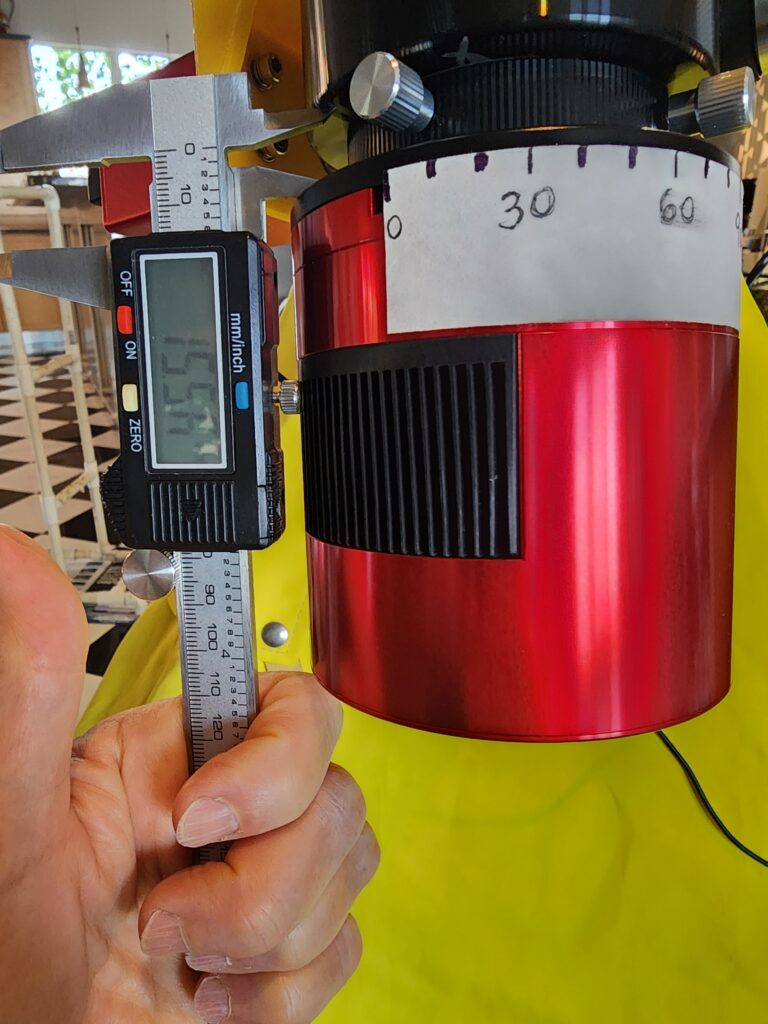
Step number three is to move the focuser all the way out (by a given number of step sizes), measure and record the distance at each step until the focuser is fully extended. This allows you to calculate how far the focuser moves in the outward position with a given step-size command from the autofocuser. Finally, you command that same step-size on the inward direction and measure if the focuser is moving inward (against gravity) the same distance as it did given that step-size in the outward direction.
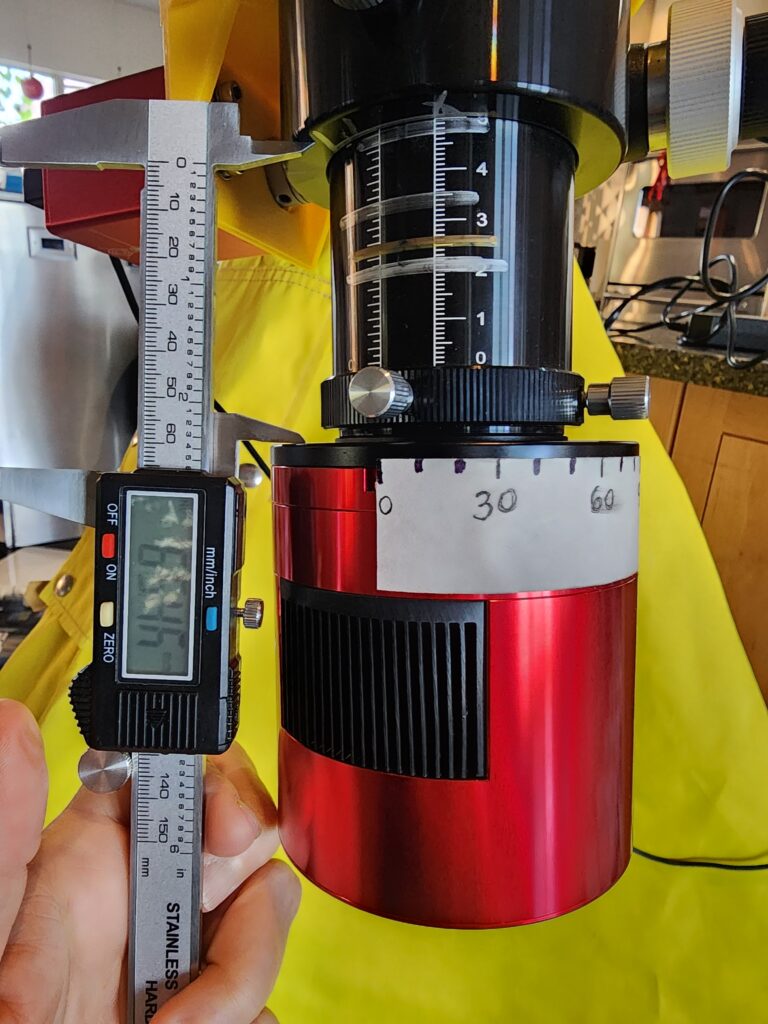
The experiment revealed that the Crayford focuser was being moved nearly the same distance in and out. But, as I started the experiment I discovered that I had the “reverse direction” check mark selected in the SGPro autofocus settings. I unchecked that box and confirmed with SGPro support that could have been my problem all along. So, it turns out that my selected settings in the algorithm’s control panel were to blame, not the focuser.
A few days earlier while I was still in the midst of the early troubleshooting with SGPro support, I remembered a conversation I’d had with MikeinWI, who I’d met through Thingiverse while searching for a 3D digital print for the autofocuser’s bracket (the yellow bracket holding the autofocuser in the pictures above). At that time, he’d said he had changed from his RC telescope’s Crayford (friction-based, https://en.wikipedia.org/wiki/Crayford_focuser ) focuser to a rack-and-pinion focuser. I reached out to him with my current issue and asked about the rack and pinion focuser. He sent me the link to the Teleskop Systems focuser he purchased and said he was very happy with it. I passed that link on to Paul, telling him I had one more experiment to do but then was considering buying one for Big Bertha.
While I was in the kitchen doing the focuser experiment to confirm that it was the problem, Paul was in the home office ordering the new rack and pinion focuser! It arrived a few days later. So, now I have a new toy (er, I mean piece of equipment) to integrate into my set-up! …and I’m back to the step-size exercise to determine the correct step size for Big Bertha with the TS R&P Focuser. ( https://www.teleskop-express.de/en/telescope-accessories-5/focusers-adapters-motorfocus-296/focusers-and-micro-transmission-92/ts-optics-2-5-rack-and-pinion-focuser-with-m90x1-connection-and-360-rotation-6970 ).
So, fast forward to the night of 16 August – our first clear night since the 28 July exercise, the experiment, and the receipt of the TS 2.5” Rack and Pinion focuser. My chance to take the first 20 minutes to get the step-size dialed in and then get on with the evening’s imaging…
I started the step size exercise at dark (approximately 2100MDT) and worked on it (patiently?) until almost midnight. The exercise determined a step size of 38, which seemed too low. The “kick the tires” run was better than the Crayford’s (with the reverse direction checkmark) straight line result. The algorithm, instead of a V, was forming a boxy U with a straight line at the bottom where the point of the V belongs…making it impossible for the algorithm to build its confidence above 90% that it was picking the correct focus point. I played around a bit with the step size (increasing it to 60, then 75) – 60 seemed the best, but still not good enough for the autofocuser routine to run reliably. My patience gave out after about 2.5 hours of fiddling with it. I shut off the autofocus routine so it wouldn’t run during the sequence, and moved onto collecting data on NGC6888 with the night I have left. During my “sleeping” time that night, I came up with other ideas of what I need to try the next time that I have a clear night! (…and perhaps a run at the focuser experiment of measuring in/out distance given a set step-size, with the focuser tension screw at different settings during the day)
If you’ve read this far and still want a short story about the image I captured (without using the autofocuser during the data collection)…
I got the sequence going right after its meridian flip and planned to collect until the end of astronomical twilight (at 0515). All went well other than the last subframe, during which the telescope and autoguider scope had gone below the roofline elevation. So the sequence ended a bit prematurely when the autoguider couldn’t find its guide star, while looking through the house!
The moon was 90% full throughout almost the entire imaging sequence, so I used the Optolong LeXtreme light pollution filter. Although the result doesn’t have the color dynamics of a dark skies capture (see the image below), I was pleased that I was able to bring out a little bit of color other than red during post-processing. The gallery image is: https://beersastrophotography.com/gallery/ngc6888-crescent-nebula/ with target fun facts, information about the data capture, and a version of NGC6888 captured in the dark skies of the CSASTRO property near Gardner, Colorado.